
Work Items
In this session, we are going to run some real-world applications on top of Unikraft.
Support Files
Session support files are available in the repository. If you already cloned the repository, update it and enter the session directory:
$ cd path/to/repository/clone

$ git pull --rebase

$ cd content/complex-apps/

$ ls -F
images/  index.md  sol/  work/
If you haven’t cloned the repository yet, clone it and enter the session directory:
$ git clone https://github.com/unikraft/asplos22-tutorial

$ cd summer-of-code-2021/content/en/complex-apps/

$ ls -F
images/  index.md  sol/  work/
00. Qemu Wrapper
As we saw during the other sessions, qemu-guest is a wrapper script over the qemu-system-x86_64 executable, to make the use of binary less painful.
In the following session, it will be very handy to use it.
To see the options for this wrapper you can use qemu-guest -h.
It is possible to run a lot of complex applications on Unikraft. In this session we analyze 3 of them:
- Sqlite
- Redis
- Nginx
01. SQLite (Tutorial)
The goal of this tutorial is to get you to set up and run SQLite on top of Unikraft.
Find the support files in the work/01-set-up-and-run-sqlite/ folder of the session directory.
SQLite is a C library that implements an encapsulated SQL database engine that does not require any setting or administration. It is one of the most popular in the world and is different from other SQL database engines because it is simple to administer, use, maintain, and test. Thanks to these features, SQLite is a fast, secure, and most crucial simple application.
The SQLite application is formed by a ported external library that depends on two other libraries that are also ported for Unikraft: pthread-embedded and newlib. To successfully compile and run the SQLite application for the KVM platform and x86-64 architecture, we follow the steps below.
Setup
First, we make sure we have the directory structure to store the local clones of Unikraft, library and application repositories. The structure should be:
workdir
|-- unikraft/
|-- libs/
`-- apps/
We clone the lib-sqlite repository in the libs/ folder.
The libraries on which lib-sqlite depends (pthread-embedded and newlib) are also to be cloned in the libs/ folder.
We clone the app-sqlite repository in the apps/ folder.
In this directory, we need to create two files:
Makefile: containing rules for building the application as well as specifying the libraries that the application needsMakefile.uk: used to define variables needed to compile the application or to add application-specific flags
Also, in the Makefile, the order in which the libraries are mentioned in the LIBS variable is important to avoid the occurrence of compilation errors.
UK_ROOT ?= $(PWD)/../../unikraft
UK_LIBS ?= $(PWD)/../../libs
LIBS := $(UK_LIBS)/lib-pthread-embedded:$(UK_LIBS)/lib-newlib:$(UK_LIBS)/lib-sqlite

all:
	@$(MAKE) -C $(UK_ROOT) A=$(PWD) L=$(LIBS)

$(MAKECMDGOALS):
	@$(MAKE) -C $(UK_ROOT) A=$(PWD) L=$(LIBS) $(MAKECMDGOALS)
Configure
We configure the application by running:
$ make menuconfig
We select the SQLite library from the configuration menu, Library Configuration section.
For starters, we select the option to generate the main source file used to run the application.
To import or export databases or CSV/SQL files, the SQLite application needs to configure a filesystem.
The filesystem we use is 9pfs.
Hence, in the Library Configuration section, we select the 9pfs filesystem within the vfscore library options.
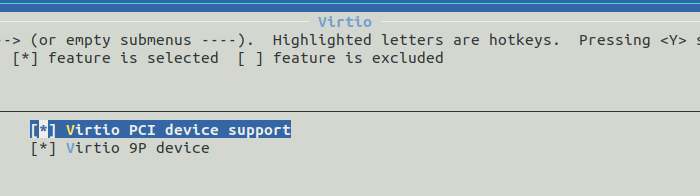
Make sure, that both options Virtio PCI device support and Virtio 9P device are selected.
Those can be found in: Platform Configuration -> KVM guest -> Virtio.
Build
We build the application by running:
$ make
Test
For testing we can use the following SQLite script, which inserts ten values into a table:
CREATE TABLE tab (d1 int, d2 text);
INSERT INTO tab VALUES (random(), cast(random() as text)),
(random(), cast(random() as text)),
(random(), cast(random() as text)),
(random(), cast(random() as text)),
(random(), cast(random() as text)),
(random(), cast(random() as text)),
(random(), cast(random() as text)),
(random(), cast(random() as text)),
(random(), cast(random() as text)),
(random(), cast(random() as text));
Up next, create a folder in the application folder called sqlite_files and write the above script into a file.
When you run the application, you can specify the path of the newly created folder to the qemu-guest as following:
$ ./qemu-guest -k ./build/app-sqlite_kvm-x86_64 \
               -e ./sqlite_files \
               -m 500
The SQLite start command has several parameters:
kindicates the executable resulting from the build of the entire system together with theSQLite applicationeindicates the path to the shared directory where the Unikraft filesystem will be mountedmindicates the memory allocated to the application
To load the SQLite script, we use the following command .read <sqlite_script_name.sql>.
And in the end, we run select * from tab to see the contents of the table.
If everything runs as expected, then we’ll see the following output:
SeaBIOS (version 1.10.2-1ubuntu1)
Booting from ROM...
Powered by
o.   .o       _ _               __ _
Oo   Oo  ___ (_) | __ __  __ _ ' _) :_
oO   oO ' _ `| | |/ /  _)' _` | |_|  _)
oOo oOO| | | | |   (| | | (_) |  _) :_
 OoOoO ._, ._:_:_,\_._,  .__,_:_, \___)
                   Tethys 0.5.0~825b115
SQLite version 3.30.1 2019-10-10 20:19:45
Enter ".help" for usage hints.
sqlite> .read script.sql
sqlite> select * from tab;
-4482895989777805454|-110319092326802521
1731384004930241734|4521105937488475129
394829130239418471|-5931220326625632549
4715172377251814631|3421393665393635031
2633802986882468389|174376437407985264
-1691186051150364618|3056262814461654943
-4054754806183404125|-2391909815601847844
-4437812378917371546|-6267837926735068846
8830824471222267926|7672933566995619644
4185269687730257244|-3477150175417807640
sqlite>
02. SQLite New Filesystem (Tutorial)
In the previous work item, we have chosen to use 9PFS as the filesystem.
For this work item, we want to change the filesystem to RamFS and load the SQLlite script as we have done in the previous work item.
Find the support files in the work/02-change-filesystem-sqlite/ folder of the session directory.
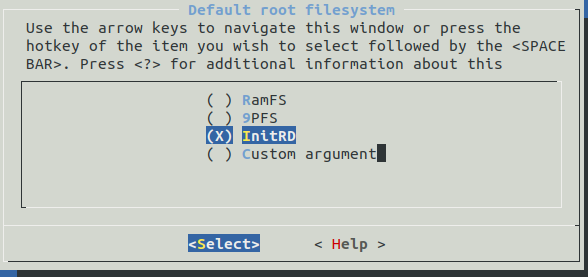
First, we need to change the filesystem to InitRD.
We can obtain that by using the command make menuconfig and from the vfscore: Configuration option, we select the default root filesystem as InitRD.
The InitRD filesystem can load only cpio archives, so to load our SQLite script into RamFS filesystem, we need to create a cpio out of it.
This can be achieved the following way: Create a folder, move the SQLite script in it, and cd in it.
After that we run the following command:
$ find -type f | bsdcpio -o --format newc > ../archive.cpio
We’ll obtain an cpio archive called archive.cpio in the parent directory.
Next we run the following qemu command to run the instance:
$ ./qemu-guest -k build/app-sqlite_kvm-x86_64 -m 100 -i archive.cpio
If everything runs as expected, then we’ll see the following output:
SeaBIOS (version 1.10.2-1ubuntu1)
Booting from ROM...
Powered by
o.   .o       _ _               __ _
Oo   Oo  ___ (_) | __ __  __ _ ' _) :_
oO   oO ' _ `| | |/ /  _)' _` | |_|  _)
oOo oOO| | | | |   (| | | (_) |  _) :_
 OoOoO ._, ._:_:_,\_._,  .__,_:_, \___)
                   Tethys 0.5.0~825b115
SQLite version 3.30.1 2019-10-10 20:19:45
Enter ".help" for usage hints.
sqlite> .read script.sql
sqlite> select * from tab;
-4482895989777805454|-110319092326802521
1731384004930241734|4521105937488475129
394829130239418471|-5931220326625632549
4715172377251814631|3421393665393635031
2633802986882468389|174376437407985264
-1691186051150364618|3056262814461654943
-4054754806183404125|-2391909815601847844
-4437812378917371546|-6267837926735068846
8830824471222267926|7672933566995619644
4185269687730257244|-3477150175417807640
sqlite>
03. Redis (Tutorial)
The goal of this tutorial is to get you to set up and run Redis on top of Unikraft.
Find the support files in the work/03-set-up-and-run-redis/ folder of the session directory.
Redis is one of the most popular key-value databases, with a design that facilitates the fast writing and reading of data from memory as well as the storage of data on disk to be able to reconstruct the state of data in memory in case of a system restart. Unlike other data storage systems, Redis supports different types of data structures such as lists, maps, strings, sets, bitmaps, streams.
The Redis application is formed by a ported external library that depends on other ported libraries for Unikraft (pthread-embedded, newlib, lwip-network library). To successfully compile and run the Redis application for the KVM platform and x86-64 architecture, we follow the steps below.
Setup
As above, we make sure we have the directory structure to store the local clones of Unikraft, library and application repositories. The structure should be:
workdir
|-- unikraft/
|-- libs/
`-- apps/
We clone the lib-redis repository in the libs/ folder.
We alsoe clonethe library repositories which lib-redis depends on ([pthread-embedded](pthread-embedded, newlib and lwip) in the libs/ folder.
We clone the app-redis repository in the apps/ folder.
In this directory, we need to create two files:
Makefile: it contains rules for building the application as well as specifying the libraries that the application needsMakefile.uk: used to define variables needed to compile the application or to add application-specific flags
Also, in the Makefile, the order in which the libraries are mentioned in the LIBS variable is important to avoid the occurrence of compilation errors.
UK_ROOT ?= $(PWD)/../../unikraft
UK_LIBS ?= $(PWD)/../../libs
LIBS := $(UK_LIBS)/lib-pthread-embedded:$(UK_LIBS)/lib-newlib:$(UK_LIBS)/lib-lwip:$(UK_LIBS)/lib-redis

all:
	@$(MAKE) -C $(UK_ROOT) A=$(PWD) L=$(LIBS)

$(MAKECMDGOALS):
	@$(MAKE) -C $(UK_ROOT) A=$(PWD) L=$(LIBS) $(MAKECMDGOALS)
Configure
We configure the application by running:
$ make menuconfig
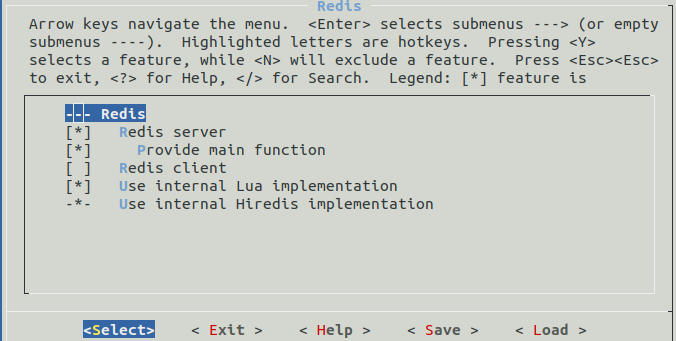
We select the Redis library from the configuration menu, Library Configuration section.
For starters, we select the option to generate the main source file used to run the application.
Build
We build the application by running:
$ make
Test
To connect to the Redis server, the network features should be configured.
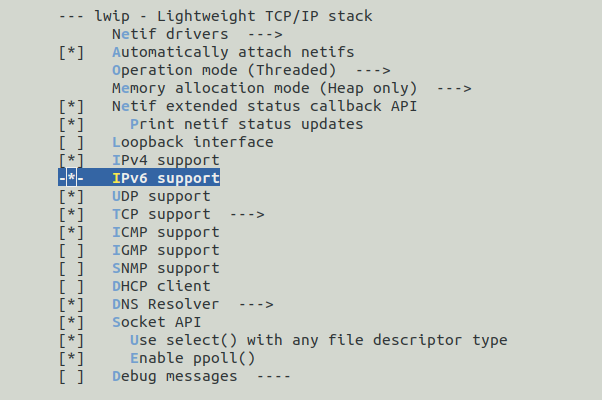
Hence, in the configuration menu in the Library Configuration section, within the lwip library the following options should be selected:
IPv4UDP supportTCP supportICMP supportDHCP supportSocket API
The Redis application needs a configuration file to start.
Thus, a filesystem should be selected in Unikraft.
The filesystem we used was 9PFS.
So, in the Library Configuration section of the configuration menu, the following selection chain should be made in the vfscore library: VFSCore Interface -> vfscore Configuration -> Automatically mount a root filesystem -> Default root filesystem -> 9PFS.
Therefore, following the steps above, the build of the entire system, together with the Redis application will be successful.
We used a script to run the application in which a bridge and a network interface (kraft0) are created.
The network interface has an IP associated with it used by clients to connect to the Redis server.
Also, the script takes care of starting the Redis server, but also of stopping it, deleting the settings created for the network.
brctl addbr kraft0
ifconfig kraft0 172.44.0.1
ifconfig kraft0 up

dnsmasq -d \
        --log-queries \
        --bind-dynamic \
        --interface=kraft0 \
        --listen-addr=172.44.0.1 \
        --dhcp-range=172.44.0.2,172.44.0.254,255.255.255.0,12h &> $WORKDIR/dnsmasq.log &

./qemu-guest.sh -k ./build/redis_kvm-x86_64 \
                -a "/redis.conf" \
                -b kraft0 \
                -e ./redis_files
                -m 100
The Redis server start command has several parameters:
kindicates the executable resulting from the build of the entire system together with theRedisapplicationeindicates the path to the shared directory where the Unikraft filesystem will be mountedbindicates the network interface used for external communicationmindicates the memory allocated to the applicationaallows the addition of parameters specific to running the application
The following image is presenting an overview of our setup:
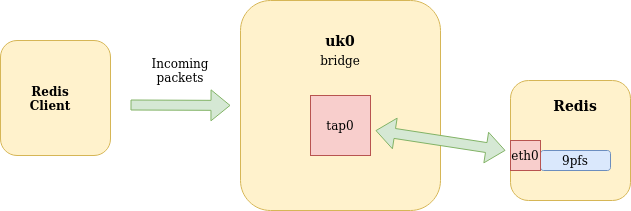
Consequently, after running the script the Redis server will start and dnsmasq will dynamically assign an IP address. The IP can be seen in the output of qemu as bellow:

Using the received IP, it will be possible to connect clients to it using redis-cli (the binary redis-cli is the folder for this work item):
$ ./redis-cli -h 172.88.0.76 -p 6379
172.88.0.2:6379> PING
PONG
172.88.0.2:6379>
04. Redis Static IP Address
In tutorial above we have dynamically assigned an IP to the network interface used by Unikraft using the dnsmasq utility.
Find the support files in the work/04-obtain-the-ip-statically/ folder of the session directory.
Modify the launching script and run the application with a static IP. Beware that the assigned IP address must differ from the one assigned on the bridge.
You can use redis-cli, found in the suport folder to test your changes.
If everything runs as expected you should see the following output:
$ ./redis-cli -h 172.88.0.76 -p 6379
172.88.0.2:6379> PING
PONG
172.88.0.2:6379>
05. Redis Benchmarking (Tutorial)
We aim to do benchmarking for the Redis app running on top of Unikraft and for the Redis running on top of Linux.
Find the support files in the work/05-benchmark-redis/ folder of the session directory.
There are three binaries: redis-cli, redis-benchmark, and redis.
First, we will start by benchmarking redis app, running on Unikraft.
Start the Redis on the top of Unikraft as we have already done at above and in another terminal run the following command:
$ ./redis-benchmark --csv -q -r 100 -n 10000 -c 1 -h 172.44.0.76 -p 6379 -P 8 -t set,get
The description of the used option can be seen here:
Usage: redis-benchmark [-h <host>] [-p <port>] [-c <clients>] [-n <requests>] [-k <boolean>]

 -h <hostname>      Server hostname (default 127.0.0.1)
 -p <port>          Server port (default 6379)
 -c <clients>       Number of parallel connections (default 50)
 -n <requests>      Total number of requests (default 100000)
 -P <numreq>        Pipeline <numreq> requests. Default 1 (no pipeline).
 -q                 Quiet. Just show query/sec values
 --csv              Output in CSV format
 -t <tests>         Only run the comma separated list of tests. The test
                    names are the same as the ones produced as output.
If everything runs as expected, you’ll see the following output:
"SET","147058.81"
"GET","153846.16"
The printed values represent requests/second for the operation set and get.
Further, we will run the executable redis-server (./redis-server), which can be found in the support folder, and the following command (only the IP address of the redis server was changed):
$ ./redis-benchmark --csv -q -r 100 -n 10000 -c 1 -h 127.0.0.1 -p 6379 -P 8 -t set,get
After that you’ll get something like this:
"SET","285714.28"
"GET","294117.62"