
The presentation was delivered by Alexander Jung and the pdf of slides can be found here.
In this session we are going to understand the basic layout of the Unikraft working directory, its environment variables, as well as what the most common Unikraft specific files mean. We are also going to take a look at how we can build basic applications and how we can extend their functionality and support by adding ported external libraries.
Before everything, let’s take a bird’s eye view of what Unikraft is and what we can do with it. Unikraft is a unikernel SDK, meaning it offers you the blocks (source code, configuration and build system, runtime support) to build and run unikernels. A unikernel is a single image file that can be loaded and run as a separate running instance, most often a virtual machine.
Summarily, Unikraft components are shown in the image below:
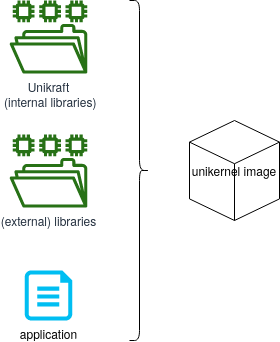
Unikraft is the core component, consisting of core / internal libraries, the build system, and platform and architecture code. It is the basis of any unikernel image. It is located in the main Unikraft repository.
Libraries are additional software components that will be linked with Unikraft for the final image.
There are multiple supported libraries.
Each unikernel image is using its specific libraries.
Libraries are also called external libraries as they sit outside the main Unikraft repository.
Libraries are typically common libraries (such as OpenSSL or LWIP) that have been ported on top of Unikraft.
They are located in specialized repositories in the Unikraft organization, those whose names start with lib-.
Application is the actual application code.
It typically provides the main() function (or equivalent) and is reliant on Unikraft and external libraries.
Applications that have been ported on top of Unikraft are located in repositories in the Unikraft organization, those whose names start with app-.
An important role of the core Unikraft component is providing support for different platforms and architectures. A platform is the virtualization / runtime environment used to run the resulting unikernel image. An architecture details the CPU and memory specifics that will run the resulting image.
As this is a rather complicated setup, a companion tool (kraft) was designed and implemented to provide the interface for configuring, building and running unikernel images based on Unikraft.
The recommended way of building and running Unikraft is via kraft.
We are going to build the helloworld application and the httpreply application using kraft.
We are also going to use the lower-level configuration and build system (based on Kconfig and Makefile) to get a grasp of how everything works.
The lower-level system will be detailed further in session 02: Behind the Scenes.
Demos
00. Manual kraft Installation
Let’s start with installing kraft (and validating the installation).
First of all, make sure you have all the dependencies installed:
$ sudo apt-get install -y --no-install-recommends build-essential \
        libncurses-dev libyaml-dev flex git wget socat bison \
        unzip uuid-runtime
We begin by cloning the kraft repository on our machine:
git clone https://github.com/unikraft/kraft.git
Now, all we have to do is enter this directory and run the setup installer:
$ cd kraft
$ pip install --user -e .
This will install kraft for the local user.
After installing or updating kraft, the first step is to download / update the software components available for building unikernel images. For this, run:
$ kraft list update
It’s very likely that running the command above will result in the following error:
GitHub rate limit exceeded. You can tell kraft to use a personal access token by setting the UK_KRAFT_GITHUB_TOKEN environmental variable.
If this is the case, first create a GitHub personal access token by following these instructions. Then, use the following command:
$ UK_KRAFT_GITHUB_TOKEN=<your_GitHub_token_here> kraft list update
After this is done, you can get a list of all components that are available for use with kraft:
$ kraft list
UNIKRAFT        	VERSION 	RELEASED    	LAST CHECKED
unikraft        	0.5     	17 hours ago	18 Aug 21

PLATFORMS       	VERSION 	RELEASED    	LAST CHECKED
solo5           	0.5     	13 Jul 21   	18 Aug 21
[...]

LIBRARIES       	VERSION 	RELEASED    	LAST CHECKED
newlib          	0.5     	5 days ago  	18 Aug 21
pthreadpool     	0.5     	7 days ago  	18 Aug 21
lwip            	0.5     	6 days ago  	18 Aug 21
[...]

APPLICATIONS    	VERSION 	RELEASED    	LAST CHECKED
python3         	0.4     	29 Mar 21   	18 Aug 21
helloworld      	0.5     	29 Mar 21   	18 Aug 21
httpreply       	0.5     	13 Jul 21   	18 Aug 21
[...]
So, with kraft we have an interface to configure, build and run unikernel images based on Unikraft core, (external) platforms, (external) libraries and applications.
By default, these are saved to ~/.unikraft/ directory, which is also the value of the UK_WORKDIR environment variable used by kraft.
This represents the working directory for all Unikraft components.
This is the usual layout of the ~/.unikraft/ directory:
|-- apps - This is where you would normally place existing app build
|-- archs - Here we place our custom arch's files
|-- libs - This is where the build system looks for external library pool sources
|-- plats - The files for our custom plats are placed here
`-- unikraft - The core source code of the Unikraft Unikernel
Apart from the general UK_WORKDIR environment variable that points to the overall directory, there are also environment variables available for the above subdirectories:
UK_ROOT - The directory for Unikraft's core source code [default: $UK_WORKDIR/unikraft]
UK_LIBS - The directory of all the external Unikraft libraries [default: $UK_WORKDIR/libs]
UK_APPS - The directory of all the template applications [default: $UK_WORKDIR/apps]
After successfully running the above commands, kraft is now installed on our system and we can get to building and running unikernels.
01. Building and Running the Helloworld Application
This is where the fun part begins - we get to build our first unikernel.
One Command to Rule Them All
kraft makes it easy to download, configure, build existing components into unikernel images and then run those images.
The kraft up command makes it easy to do that with one swoop.
Let’s do that for the helloworld application (listed with kraft list):
$ kraft up -t helloworld hello
 100.00% :::::::::::::::::::::::::::::::::::::::: |       21 /       21 |:  app/helloworld@0.5
[INFO    ] Initialized new unikraft application: /home/razvan/hello
make: Entering directory '/home/razvan/.unikraft/unikraft'
[...]
#
# configuration written to /home/razvan/hello/.config
#
[...]
CC      libkvmplat: trace.common.o
CC      libkvmplat: traps.isr.o
CC      libkvmplat: cpu_features.common.o
[...]
CC      libnolibc: errno.o
CC      libnolibc: stdio.o
CC      libnolibc: ctype.o
[...]
LD      hello_kvm-x86_64.ld.o
OBJCOPY hello_kvm-x86_64.o
LD      hello_kvm-x86_64.dbg
SCSTRIP hello_kvm-x86_64
GZ      hello_kvm-x86_64.gz
LN      hello_kvm-x86_64.dbg.gdb.py
[...]
Successfully built unikernels:

  => build/hello_kvm-x86_64
  => build/hello_kvm-x86_64.dbg (with symbols)

[...]
To instantiate, use: kraft run
[...]
Starting VM...
[...]
                   Tethys 0.5.0~b8be82b
Hello world!
Arguments:  "/home/razvan/hello/build/hello_kvm-x86_64" "console=ttyS0"
In the snippet above, we selected parts of the output showing what kraft does behind the scenes:
- It downloads the
helloworldapplication repository in thehello/directory. - It configures the repository, resulting in a
.configfile. - It builds the required components, resulting in the
build/hello_kvm-x86_64unikernel image. - It runs the image, resulting in QEMU/KVM being run, with the “Hello world!” message getting printed.
All that magic is done using one command.
A closer inspection of the hello/ folder reveals it is a clone of the app-helloworld repository and it stores the resulting configuration file (.config) and resulting build folder (and images) (build/):
$ ls -Fa hello/
./  ../  build/  CODING_STYLE.md  .config  Config.uk  CONTRIBUTING.md  COPYING.md  .git/  kraft.yaml  main.c  MAINTAINERS.md  Makefile  Makefile.uk  monkey.h  README.md
Once this is done, we can now run the resulting unikernel image any time we want by simply using kraft run:
$ cd hello/
$ kraft run
[...]
                   Tethys 0.5.0~b8be82b
Hello world!
Arguments:  "/home/razvan/hello/build/hello_kvm-x86_64" "console=ttyS0"
Doing it Step-by-Step Using kraft
The above kraft up command seems like magic and it’s not very clear what’s really happening.
Let’s break that down into subcommands and really get a good grip of the configure, build and run process.
We will go through the same steps above, running a separate command for each step:
- Download / Initialize the helloworld appplication.
- Configure the application, resulting in a
.configfile. - Build the required components, resulting in the
build/hello_kvm-x86_64unikernel image. - Run the image, with the “Hello world!” message getting printed.
Initialize
First, let’s create a directory that will host the application.
We enter the demo/ directory of the current session and we create the 01-hello-world/ directory:
$ cd demo/
$ mkdir 01-hello-world
$ cd 01-hello-world/
Now, we initialize the application by using the template for the helloworld app and see that it’s populated with files belonging to the app:
$ kraft init -t helloworld
$ ls
CODING_STYLE.md  Config.uk  CONTRIBUTING.md  COPYING.md  kraft.yaml  main.c  MAINTAINERS.md  Makefile  Makefile.uk  monkey.h  README.md
The kraft.yaml file is the most important file.
It stores kraft-speficic configuration for the app and it’s used by kraft when configuring, building and running the application.
Other files are important as well, but they are used behind the scenes by kraft.
We will detail them later in the session and in session 02: Behind the Scenes.
Configure
A unikernel image may be targeted for multiple platforms and architectures.
The available platforms and applications are listed in the kraft.yaml file:
$ cat kraft.yaml
specification: '0.4'

unikraft: '0.5'

architectures:
  x86_64: true
  arm64: true

platforms:
  linuxu: true
  kvm: true
  xen: true
In our case, we can target the x86_64 or arm64 architectures.
And we can target linuxu, kvm or xen platforms.
The simplest way to select the platform and architecture is by running kraft configure and then interactively use arrow keys to select the desired option:
$ kraft configure
[?] Which target would you like to configure?: 01-hello-world_linuxu-x86_64
 > 01-hello-world_linuxu-x86_64
   01-hello-world_kvm-x86_64
   01-hello-world_xen-x86_64
   01-hello-world_linuxu-arm64
   01-hello-world_kvm-arm64
   01-hello-world_xen-arm64
We have 6 options (2 architectures x 3 platforms). Once we select one, the configuration will be updated.
The alternate way (non-interactive) is to pass arguments to kraft configure to select the desired platform and architecture.
For example, if we want to use x86_64 and KVM, we use:
$ kraft configure -p kvm -m x86_64
Build
Everything is set up now, all we have left to do is tell the build system to do its magic:
$ kraft build
[...]
Successfully built unikernels:

  => build/01-hello-world_kvm-x86_64
  => build/01-hello-world_kvm-x86_64.dbg (with symbols)

To instantiate, use: kraft run
This results in the creation of two unikernel image files:
build/01-hello-world_kvm-x86_64- the main image filebuild/01-hello-world_kvm-x86_64.dbg- the image file with debug information (useful for debugging, duh!)
And that’s it! Our final unikernel binary is ready to be launched from the build/ directory.
Run
To run an already-built unikernel image, we use kraft run:
$ kraft run
[...]

                   Tethys 0.5.0~b8be82b
Hello world!
[...]
If we want to be more specific, we could use:
$ kraft run -p kvm -m x86_64
This command is useful in the case we have multiple images built (for differing platforms and architectures). We can then select which one to run.
For example, we can use the commands below to configure, build and run a helloworld image for the linuxu platform.
kraft configure -p linuxu -m x86_64
kraft build
kraft run -p linuxu -m x86_64
You can now alter between running the linuxu and the kvm built images by using kraft run with the appropriate arguments.
More on kraft
Of course, this is the most basic way you can use kraft, but there are many other options.
To see every option kraft has to offer, you can simply type kraft -h.
If you want to know about a certain command, just follow it with the -h option.
For example, if I wanted to know more about the configure command, I would type kraft configure -h.
Manually Building the helloworld Application
Let’s now learn how to build the app manually, without kraft.
We won’t go into too much detail, this will be handled more thoroughly in session 02: Behind the Scenes.
The manual approach is more complicated (albeit giving you potentially more control) than kraft. For most of the use cases (development, testing, evaluating, using) of Unikraft, we recommend you use kraft.
We will go through the same steps as above:
- Download / Initialize the helloworld application.
- Configure the application, resulting in a
.configfile. - Build the required components, resulting in the
build/hello_kvm-x86_64unikernel image. - Run the image, with the “Hello world!” message getting printed.
Initialize
First, get out of the current build’s directory and make a new one:
$ cd ../ && mkdir 01-hello-world-manual && cd 01-hello-world-manual
Now, clone the remote Git repository:
$ git clone https://github.com/unikraft/app-helloworld.git .
$ ls
CODING_STYLE.md  Config.uk  CONTRIBUTING.md  COPYING.md  kraft.yaml  main.c  MAINTAINERS.md  Makefile  Makefile.uk  monkey.h  README.md
Configure
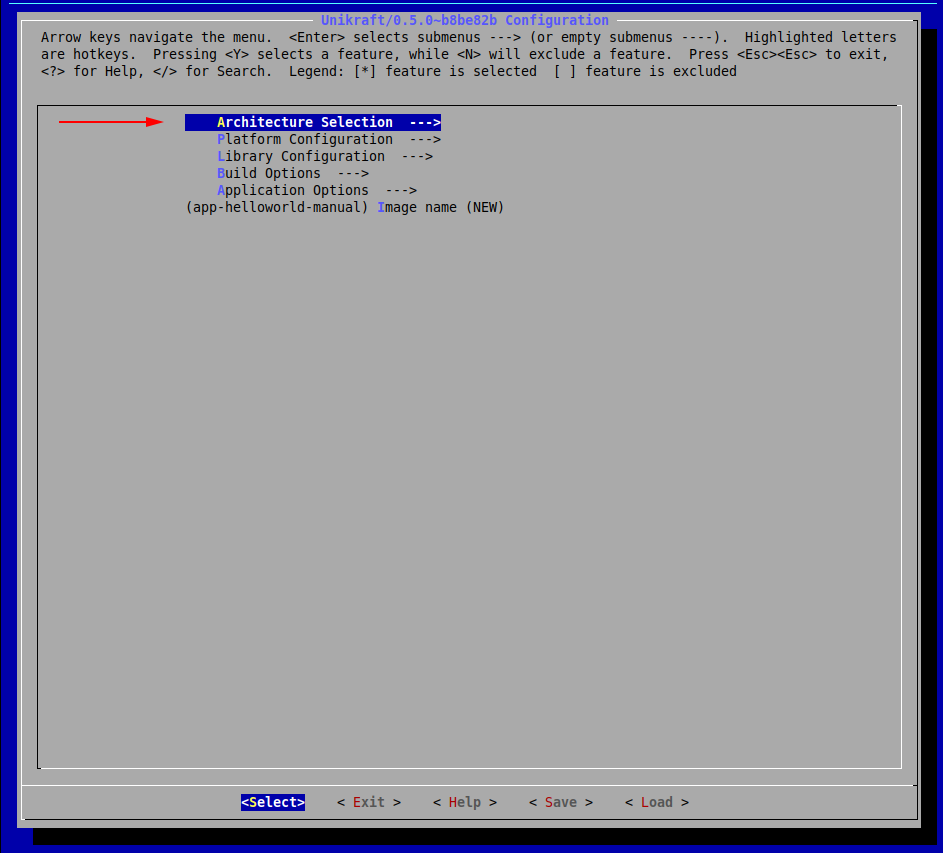
To configure the build process (and the resulting unikernel image) we access a text-user interface menu by using:
$ make menuconfig
Looks like we are met with an error:
$ make menuconfig
Makefile:9: recipe for target 'menuconfig' failed
make: *** [menuconfig] Error 2
We look in the Makefile:
$ cat -n Makefile
     1  UK_ROOT ?= $(PWD)/../../unikraft
     2  UK_LIBS ?= $(PWD)/../../libs
     3  LIBS :=
     4
     5  all:
     6          @$(MAKE) -C $(UK_ROOT) A=$(PWD) L=$(LIBS)
     7
     8  $(MAKECMDGOALS):
     9          @$(MAKE) -C $(UK_ROOT) A=$(PWD) L=$(LIBS) $(MAKECMDGOALS)
The underlying build / configuration system expects the Unikernel (UK_ROOT) to be located at ../../unikraft from the current directory, which is very likely not the case.
Recall that the build system makes use of some important environment variables, namely UK_WORKDIR, UK_ROOT and UK_LIBS.
So, in order to properly inform the build system of our current location, we will have to manually set these by prefixing whatever build command we send with the hardcoded values of where our Unikraft work directory is.
$ UK_WORKDIR=~/.unikraft UK_ROOT=~/.unikraft/unikraft UK_LIBS=~/.unikraft/libs make menuconfig
Note: This menu is also available through the kraft menuconfig command, which rids you of the hassle of manually setting the environment variables.
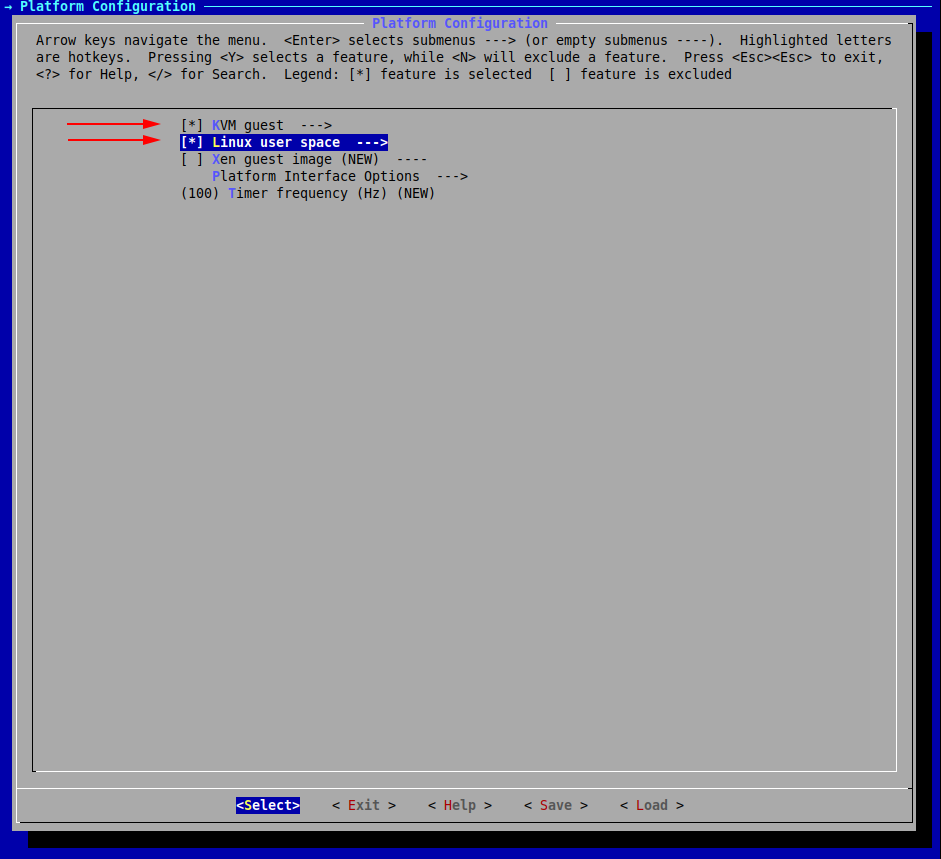
We are met with the following configuration menu. Let’s pick the architecture:
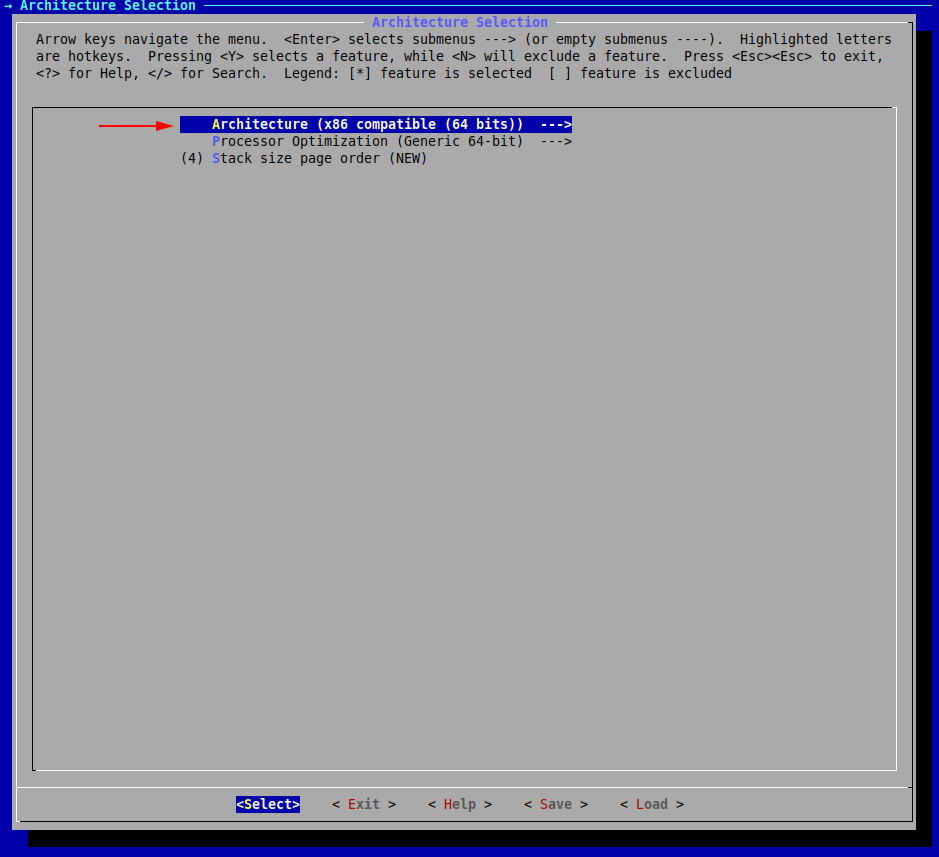

Now, press Exit (or hit the Esc key twice) until you return to the initial menu.
We have now set our desired architecture, let’s now proceed with the platform.
We will choose both linuxu and kvm:
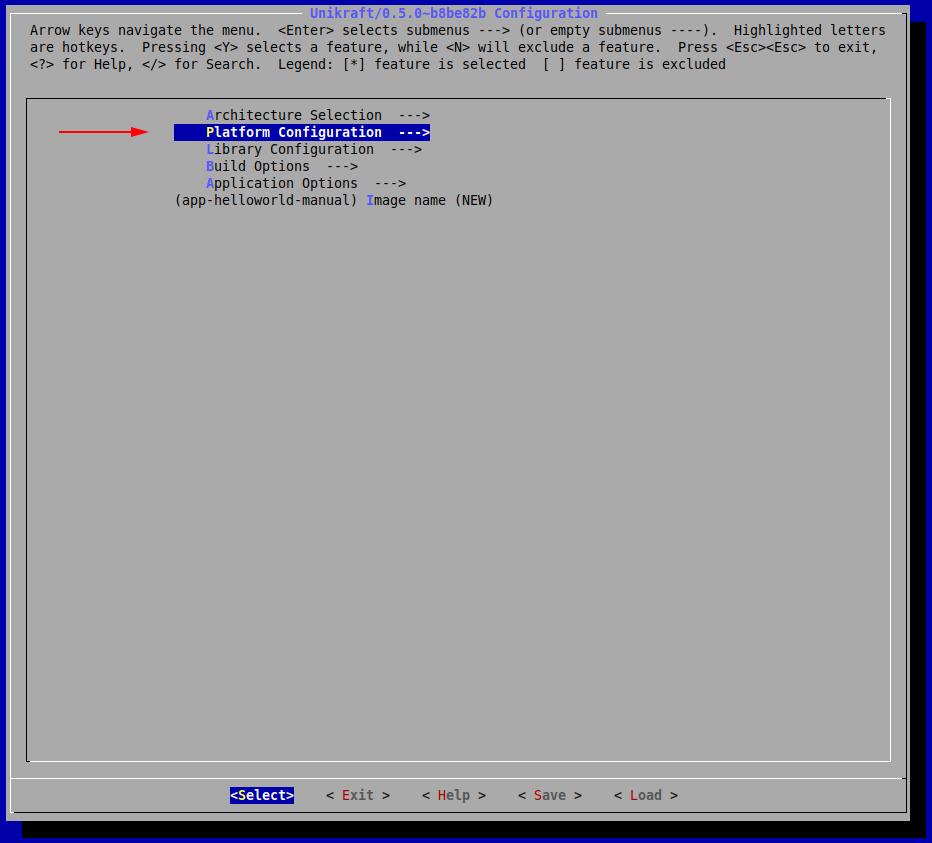
Save and exit the configuration menu by repeatedly selecting Exit.
Build
Now let’s build the final image (recall the environment variables):
$ UK_WORKDIR=~/.unikraft UK_ROOT=~/.unikraft/unikraft UK_LIBS=~/.unikraft/libs  make
[...]
  LD      01-hello-world-manual_linuxu-x86_64.dbg
  SCSTRIP 01-hello-world-manual_kvm-x86_64
  GZ      01-hello-world-manual_kvm-x86_64.gz
  SCSTRIP 01-hello-world-manual_linuxu-x86_64
  LN      01-hello-world-manual_kvm-x86_64.dbg.gdb.py
  LN      01-hello-world-manual_linuxu-x86_64.dbg.gdb.py
Our final binaries are located inside the build/ directory.
Run
Let’s run the linuxu image by doing a Linux-like executable running:
$ ./build/01-hello-world-manual_linuxu-x86_64  # The linuxu image
Powered by
o.   .o       _ _               __ _
Oo   Oo  ___ (_) | __ __  __ _ ' _) :_
oO   oO ' _ `| | |/ /  _)' _` | |_|  _)
oOo oOO| | | | |   (| | | (_) |  _) :_
 OoOoO ._, ._:_:_,\_._,  .__,_:_, \___)
                   Tethys 0.5.0~b8be82b
Hello world!
To run the KVM image, we use the qemu-system-x86_64 command:
$ qemu-system-x86_64 -kernel build/01-hello-world-manual_kvm-x86_64 -nographic
Powered by
o.   .o       _ _               __ _
Oo   Oo  ___ (_) | __ __  __ _ ' _) :_
oO   oO ' _ `| | |/ /  _)' _` | |_|  _)
oOo oOO| | | | |   (| | | (_) |  _) :_
 OoOoO ._, ._:_:_,\_._,  .__,_:_, \___)
                   Tethys 0.5.0~b8be82b
Hello world!
Arguments:  "build/hello_kvm-x86_64"
02. Building and Running the httpreply Application
This is where we will take a look at how to build a basic HTTP Server both through kraft and manually.
The latter involves understanding how to integrate ported external libraries, such as lwip.
Using kraft
Just as before, let’s create a directory that will host the application.
We enter the demo/ directory of the current session and we create the 01-hello-world/ directory:
$ cd demo/
$ mkdir 02-httpreply
$ cd 02-httpreply/
Now, we go through the steps above.
Initialize
Retrieve the already existing template for httpreply:
$ kraft init -t httpreply
Configure
Configure the building of a KVM unikernel image for x86_64:
$ kraft configure -p kvm -m x86_64
Build
$ kraft build
Run
$ kraft run -p kvm -m x86_64
[...]
Powered by
o.   .o       _ _               __ _
Oo   Oo  ___ (_) | __ __  __ _ ' _) :_
oO   oO ' _ `| | |/ /  _)' _` | |_|  _)
oOo oOO| | | | |   (| | | (_) |  _) :_
 OoOoO ._, ._:_:_,\_._,  .__,_:_, \___)
                   Tethys 0.5.0~b8be82b
Listening on port 8123...
Use Ctrl+c to stop the HTTP server running as a unikernel virtual machine.
Connecting to the HTTP Server
The server listens on port 8123 but we can’t access it, as the virtual machine doesn’t have a (virtual) network connection to the host system and it doesn’t have an IP address.
So we have to create a connection and assign an IP address.
We use a virtual bridge to create a connection between the VM and the host system.
We assign address 172.44.0.1/24 to the bridge interface (pointing to the host) and we assign address 172.44.0.2/24 to the virtual machine, by passing boot arguments.
We run the commands below to create and assign the IP address to the bridge virbr0:
$ sudo brctl addbr virbr0
$ sudo ip a a  172.44.0.1/24 dev virbr0
$ sudo ip l set dev virbr0 up
We can check the proper configuration:
$ ip a s virbr0
420: virbr0: <BROADCAST,MULTICAST,UP,LOWER_UP> mtu 1500 qdisc noqueue state UNKNOWN group default qlen 1000
    link/ether 3a:3e:88:e6:a1:e4 brd ff:ff:ff:ff:ff:ff
    inet 172.44.0.1/24 scope global virbr0
       valid_lft forever preferred_lft forever
    inet6 fe80::383e:88ff:fee6:a1e4/64 scope link
       valid_lft forever preferred_lft forever
Now we start the virtual machine and pass it the proper arguments to assign the IP address 172.44.0.2/24:
$ kraft run -b virbr0 "netdev.ipv4_addr=172.44.0.2 netdev.ipv4_gw_addr=172.44.0.1 netdev.ipv4_subnet_mask=255.255.255.0 --"
[...]
0: Set IPv4 address 172.44.0.2 mask 255.255.255.0 gw 172.44.0.1
en0: Added
en0: Interface is up
Powered by
o.   .o       _ _               __ _
Oo   Oo  ___ (_) | __ __  __ _ ' _) :_
oO   oO ' _ `| | |/ /  _)' _` | |_|  _)
oOo oOO| | | | |   (| | | (_) |  _) :_
 OoOoO ._, ._:_:_,\_._,  .__,_:_, \___)
                   Tethys 0.5.0~b8be82b
Listening on port 8123...
The boot message confirms the assigning of the 172.44.0.2/24 IP address to the virtual machine.
It’s listening on port 8123 for HTTP connections on that IP address.
We use wget to validate it’s working properly and we are able to get the index.html file:
$ wget 172.44.0.2:8123
--2021-08-18 16:47:38--  http://172.44.0.2:8123/
Connecting to 172.44.0.2:8123... connected.
HTTP request sent, awaiting response... 200 OK
[...]
2021-08-18 16:47:38 (41.5 MB/s) - ‘index.html’ saved [160]
Cleaning up means closing the virtual machine (and the HTTP server) and disabling and deleting the bridge interface:
$ sudo ip l set dev virbr0 down
$ sudo brctl delbr virbr0
Generating a initram
Create a filesystem CPIO file by cding into the directory you wish to mount, then running:
find -depth -print | tac | bsdcpio -o --format newc > ../initramfs.cpio
This generates initramfs.cpio which you can mount like so via qemu-guest:
qemu-guest -k ./build/myunikerne_kvm-x86_64 -i ./initramfs.cpio
Be sure to enable ukcpio, ramfs, and to set “InitRD” as the default mount in vfscore.
The Manual Way
Initialize
First, move into a new directory and clone the httpreply repo there.
$ cd .. && mkdir 02-httpreply-manual && cd 02-httpreply-manual
$ git clone https://github.com/unikraft/app-httpreply .
Adding a Makefile
Unlike before, you can notice that this time we are missing the regular Makefile.
Let’s start by copying the Makefile from helloworld:
$ cp ../01-hello-world/Makefile .
This is how it looks like:
$ cat Makefile
UK_ROOT ?= $(PWD)/../../unikraft
UK_LIBS ?= $(PWD)/../../libs
LIBS :=

all:
	@$(MAKE) -C $(UK_ROOT) A=$(PWD) L=$(LIBS)

$(MAKECMDGOALS):
	@$(MAKE) -C $(UK_ROOT) A=$(PWD) L=$(LIBS) $(MAKECMDGOALS)
As you can see, the previously presented environment values make the same wrong assumption.
Previously, we fixed this by preceding the make command with the updated values for the environment variables, but we could have also simply modified them from within the Makefile, like so:
UK_ROOT ?= $(HOME)/.unikraft/unikraft
UK_LIBS ?= $(HOME)/.unikraft/libs
LIBS :=


	@$(MAKE) -C $(UK_ROOT) A=$(PWD) L=$(LIBS)

$(MAKECMDGOALS):
	@$(MAKE) -C $(UK_ROOT) A=$(PWD) L=$(LIBS) $(MAKECMDGOALS)
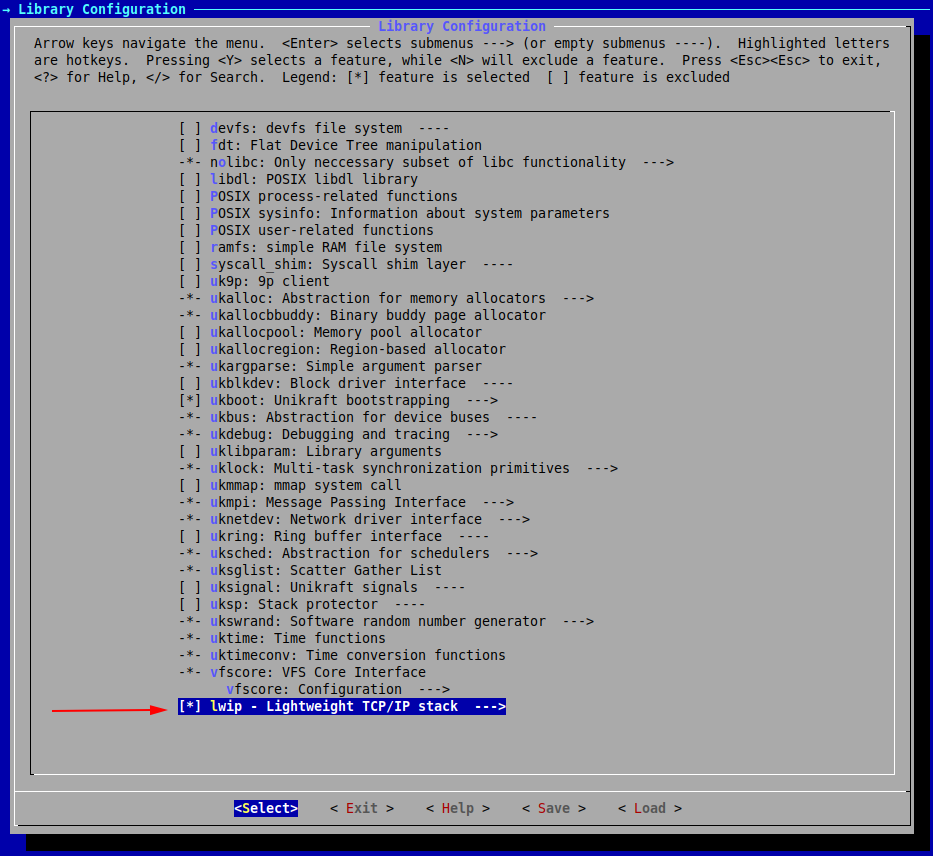
For the HTTP server, however, we need the lwip library, and we have to add it to the LIBS variable in the Makefile.
We add it by first downloading it on our system in $(UK_WORKDIR)/libs/:
$ git clone https://github.com/unikraft/lib-lwip ~/.unikraft/libs/lwip
fatal: destination path '~/.unikraft/libs/lwip' already exists and is not an empty directory.
The library is already cloned. That is because kraft took care of it for us behind the scenes in our previous automatic build.
The next step is to add this library in the Makefile:
UK_ROOT ?= $(HOME)/.unikraft/unikraft
UK_LIBS ?= $(HOME)/.unikraft/libs
LIBS := $(UK_LIBS)/lwip

all:
        @$(MAKE) -C $(UK_ROOT) A=$(PWD) L=$(LIBS)

$(MAKECMDGOALS):
        @$(MAKE) -C $(UK_ROOT) A=$(PWD) L=$(LIBS) $(MAKECMDGOALS)
Configure
Now, we configure it through make menuconfig.
If you noticed, the menu also automatically selected some other internal components that would be required by lwip.
Now Save and Exit the configuration and run make.
Build
$ make
Run
To run the KVM image, we use the qemu-system-x86_64 command:
$ qemu-system-x86_64 -kernel build/02-httpreply-manual_kvm-x86_64 -nographic
[...]
Powered by
o.   .o       _ _               __ _
Oo   Oo  ___ (_) | __ __  __ _ ' _) :_
oO   oO ' _ `| | |/ /  _)' _` | |_|  _)
oOo oOO| | | | |   (| | | (_) |  _) :_
 OoOoO ._, ._:_:_,\_._,  .__,_:_, \___)
                   Tethys 0.5.0~b8be82b
Listening on port 8123...
To close the running QEMU process, use the Ctrl+a x key combination.
Note: We didn’t go into configuring a functional network connection and actually querying the HTTP server. This is a bit more complicated and is outside the scope of this session.
sudo qemu-system-x86_64 -netdev bridge,id=en0,br=virbr0 -device virtio-net-pci,netdev=en0 -append "netdev.ipv4_addr=172.44.0.2 netdev.ipv4_gw_addr=172.44.0.1 netdev.ipv4_subnet_mask=255.255.255.0 --" -kernel build/02-httpreply-manual_kvm-x86_64 -nographic
Connecting to the HTTP Server
Similarly to kraft, in order to connect to the HTTP server, we use a virtual bridge to create a connection between the VM and the host system.
We assign address 172.44.0.1/24 to the bridge interface (pointing to the host) and we assign address 172.44.0.2/24 to the virtual machine, by passing boot arguments.
We run the commands below to create and assign the IP address to the bridge virbr0:
$ sudo brctl addbr virbr0
$ sudo ip a a  172.44.0.1/24 dev virbr0
$ sudo ip l set dev virbr0 up
Now we start the virtul machine and pass it the proper arguments to assing the IP address 172.44.0.2/24:
$ sudo qemu-system-x86_64 -netdev bridge,id=en0,br=virbr0 -device virtio-net-pci,netdev=en0 -append "netdev.ipv4_addr=172.44.0.2 netdev.ipv4_gw_addr=172.44.0.1 netdev.ipv4_subnet_mask=255.255.255.0 --" -kernel build/02-httpreply-manual_kvm-x86_64 -nographic
0: Set IPv4 address 172.44.0.2 mask 255.255.255.0 gw 172.44.0.1
en0: Added
en0: Interface is up
Powered by
o.   .o       _ _               __ _
Oo   Oo  ___ (_) | __ __  __ _ ' _) :_
oO   oO ' _ `| | |/ /  _)' _` | |_|  _)
oOo oOO| | | | |   (| | | (_) |  _) :_
 OoOoO ._, ._:_:_,\_._,  .__,_:_, \___)
                   Tethys 0.5.0~b8be82b
Listening on port 8123...
[...]
The boot message confirms the assigning of the 172.44.0.2/24 IP address to the virtual machine.
It’s listening on port 8123 for HTTP connections on that IP address.
We use wget to validate it’s working properly and we are able to get the index.html file:
$ wget 172.44.0.2:8123
--2021-08-18 16:47:38--  http://172.44.0.2:8123/
Connecting to 172.44.0.2:8123... connected.
HTTP request sent, awaiting response... 200 OK
[...]
2021-08-18 16:47:38 (41.5 MB/s) - ‘index.html’ saved [160]
Cleaning up means closing the virtual machine (and the HTTP server) and disabling and deleting the bridge interface:
$ sudo ip l set dev virbr0 down
$ sudo brctl delbr virbr0
Summary
kraftis an extremely useful tool for quickly deploying unikernel images.
It abstracts away many factors that would normally increase the difficulty of such tasks.
Through just a simple set of a few commands, we can build and run a set of fast and secure unikernel images with low memory footprint.
Practical Work
01. Echo-back Server
You will have to implement a simple echo-back server in C for the KVM platform.
The application will have to be able to open a socket on 172.44.0.2:1234 and send back to the client whatever the client sends to the server.
If the client closes the connection, the server will automatically close.
Enter the work/01-echo-back/ directory.
Check the source code file (main.c) and support files.
Work on the contents to have a viable echo-back server implementation.
Things to consider:
- You will need some network client utility such as
netcat. - You will need the Lightweight TCP/IP stack library (lwip): https://github.com/unikraft/lib-lwip
- You will have to update the build and support files in the
work/01-echo-back/directory. - If you want to run the application without
kraft, the KVM launch script and network setup are already included insidework/01-echo-back/launch.sh.
To test if your application works you can try sending it messages like so:
$ nc 172.44.0.2 1234
After connecting to the server, whatever you enter in standard input, should be echoed back to you.
02. ROT-13
Update the previously built application, to echo back a rot-13 encoded message.
To do this, you will have to create a custom function inside lwip (~/.unikraft/libs/lwip/) that your application (from the new directory work/02-rot13) can call in order to encode the string.
For example, you could implement the function void rot13(char *msg); inside ~/.unikraft/libs/lwip/sockets.c and add its header inside ~/.unikraft/libs/lwip/include/sys/socket.h.
The required resources are the exact same as in the previous exercise, you will just have to update lwip.
To test if this works, use the same methodology as before, but ensure that the echoed back string is encoded.
03. Tutorial: Mount 9pfs
In this tutorial, we will see what we would need to do if we wanted to have a filesystem available.
To make it easy, we will use the 9pfs filesystem, as well as the newlib library.
The latter is used so that we have available an API that would enable us to interact with this filesystem (functions such as lseek, open).
Note: the build will fail if unikraft and newlib repositories aren’t both on the staging or the stable branches.
To avoid this situation, go to ~/.unikraft/unikraft and checkout branch staging:
cd ~/.unikraft/unikraft
git checkout staging
We will need to download newlib:
git clone https://github.com/unikraft/lib-newlib.git ~/.unikraft/libs/newlib
Next, we include it in our Makefile:
LIBS := $(UK_LIBS)/lwip:$(UK_LIBS)/newlib
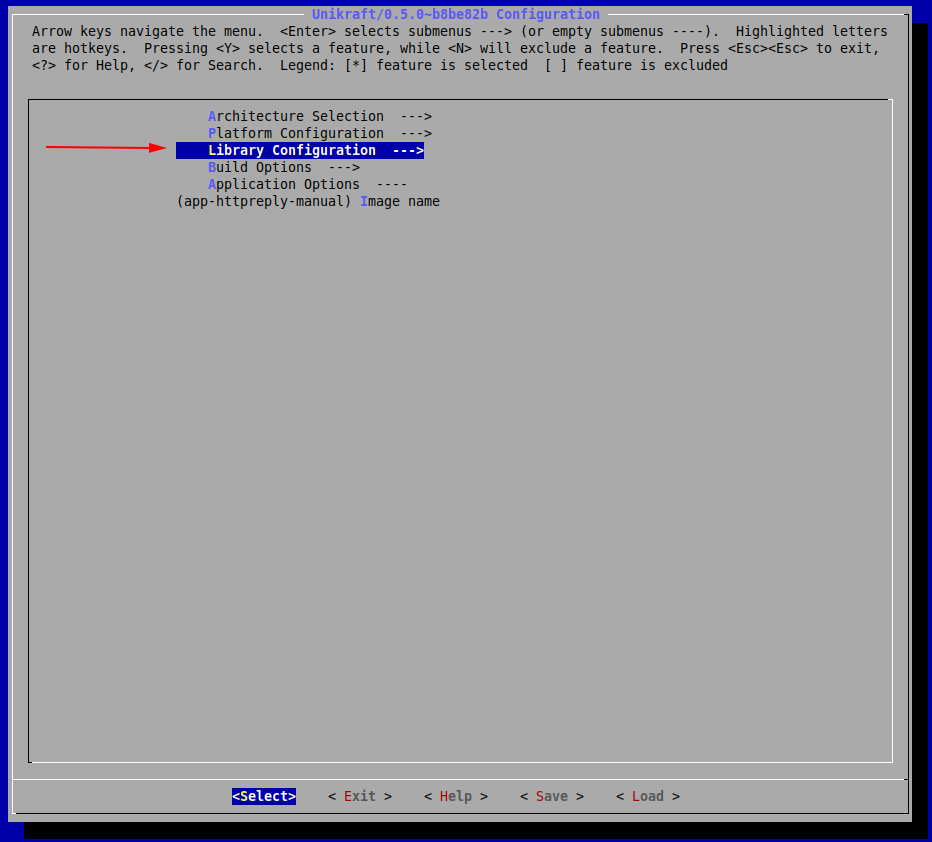
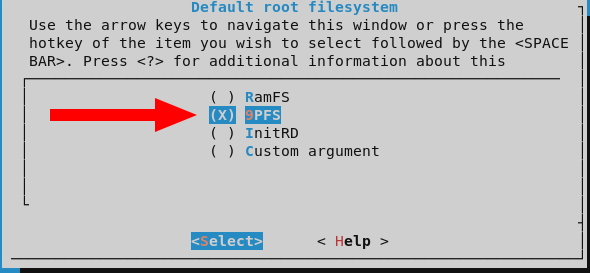
And now, for the final step, through make menuconfig make sure you have selected libnewlib as well as 9pfs: 9p filesystem inside the Library Configuration menu.
We will also check these options inside Library Configuration -> vfscore: Configuration:

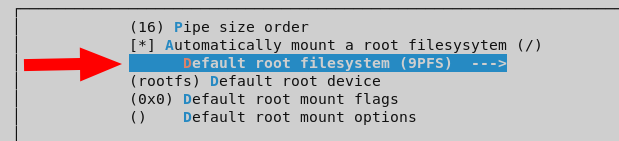
What is more, you should also have present in the current directory an additional directory called fs0:
mkdir fs0
And so, fs0 will contain whatever files you create, read from or write to from within your unikernel.
For now, just make sure it successfully builds. If it does, move on to the next work item.
04. Store Strings
For the final work item, you will have to update the source code from the second task, so that it stores in a file the received string before sending the encoded one back to the client. In order to achieve this, you must have the previous work item completed.
The available resources are the exact same, you will simply have to modify main.c.
To test if your application ran successfully, check to see whether the original strings you sent through the client are present in that file or not.